Few things are more exciting for a boater than the start of warm weather and the promise of setting off to sea under clear blue skies.
If you own a small vessel, like a fishing boat or dinghy, you might have invested in an outboard motor for a little propulsion. The following guide overviews the basic parts of a tiller-operated outboard motor and how to hook one up to your boat.
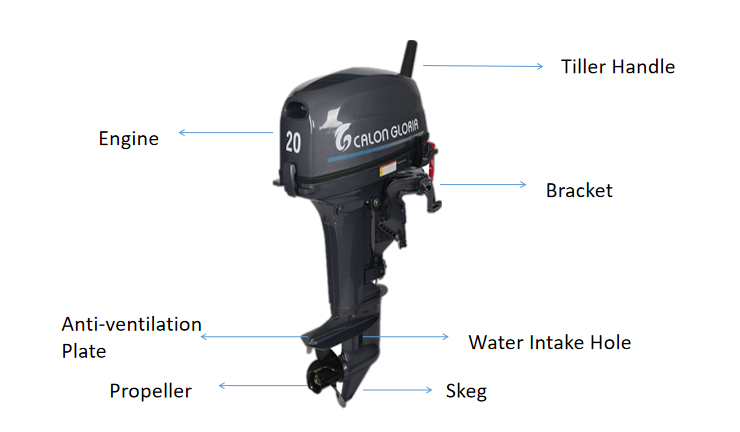
The following explains the main parts of an outboard motor.

Engine: Powers the outboard engine
Tiller Handle: Used for manually steering the motor
Bracket: Used to mount the outboard engine to the boat transom
Anti-ventilation Plate: Prevents surface air from being sucked into the propeller blades
Water Intake Hole: Draws water for engine cooling
Propeller: Propels the boat
Skeg: Acts as a rudder
Now, use the outboard boat motor installation steps below to get your outboard mounted. Always consult your owner's manual as directions may vary by model.
Properly sizing your outboard motor is of the utmost importance for performance and safety. If it's too long for your boat, it will cause the vessel to drag. If it’s too short, air will get into the propeller, causing cavitation and damage.
To avoid these problems, you need to figure out the proper outboard motor height. First, measure your boat's stern or transom from top to bottom (measure in the middle of the stern).
This transom height should match your outboard motor's shaft length, which is measured from the bottom of the engine head to the anti-ventilation plate. I recommend adding up to 2 inches to the outboard motor shaft length to be on the safe side (see height diagram).
So, for example, if your small fishing boat has a height of 15 inches in the back, you would want to choose an outboard motor with a shaft length of 15-17 inches.
The other aspect of sizing is choosing the correct horsepower. Follow the horsepower limits listed on your boat's capacity plate. Typically, you will be fine with a horsepower that is half the maximum listed on the capacity plate.
Install the outboard motor at the stern center of the boat. Attach the mounting bracket to the boat's transom and tighten the bracket screws.
For extra security, in case the clamps come loose, tie a rope through the hole in the mounting bracket and secure the other end to the boat.
Having the proper motor angle when cruising is important for the boat's stability. If the motor is angled too far, it will cause the boat to 'quat' upwards. If it's angled too close, the boat will plow downwards.
The motor shaft should be angled parallel to the stern in most cases. Your outboard motor owner's manual may specify differently, so always follow that.
Place the outboard motor's portable fuel tank in a well-ventilated part of the boat that is away from direct sunlight. It should be no more than 6 feet away from the outboard motor and not more than 3 feet below the fuel connector.
You also don't want the tank to move around, so keep it secured. Connect the tank and outboard motor using the fuel hose.
The above steps are generalized installation procedures for tiller-operated outboard motors. I can't stress enough that each brand and model of outboard motor will have specific installation procedures that you should follow in the owner's manual.
Finally, always put safety first before starting your motor. Make sure everything is attached correctly and securely and go through this startup checklist.
As an avid boater myself, I can say that trying a new motor out for the first time is truly exciting. I hope you have as much fun with it as I do.
Happy boating!
(BY Dale FROM: www.powerequipmentdirect.com)
Previous: Choosing the Right Engine for Your Yacht